Grapefruit Drizzle Cake
It had to be a bundt. I remain in love with my bundt tin (this cheapy from Amazon is a great starter one if you can't justify shelling out for Nordicware) and can't wait til I am free to buy myself more creative-shaped bakeware. People who followed me through the challenge will have probably noticed that my posting has gone from daily (back then) to less than sporadic now I'm over here. It's partly because I'm still pre-occupied with my small bites of elephant, and mostly because I have a few things I can't share on a blog which is poles apart from my usual confessional style of blogging.
Nevertheless, there will come a day when my life has changed to the extent that not only will I be the proud owner of a new bundt tin or two, but I may also have a real live KitchenAid Artisan in my kitchen too. Slowly slowly, catchy monkey and all that.

It was shared with my work colleagues as 'an experiment, so don't expect to much' but given the rave reviews it got including a 9/10 from my (very biased chief) cake tester, I decided it was worthwhile sharing on the blog. Personally, I would have liked a little more drizzle on the cake so the recipe recommends double the quanity
And this is how I did it.
- 225g soft, unsalted butter plus extra for greasing the tin
- 450g caster sugar
- 4 medium eggs
- 300g low fat Greek yogurt
- 350g plain flour plus extra for dusting the pan
- 1/2 tsp bicarbonate of soda
- 1/2 tsp table salt
- 1 tsp orange or lemon extract
- zest and juice one pink grapefruit (you may need two depending on the size and how juicy they are)
- zest of one lime
- 25g golden granulated sugar plus extra for sprinkling
- 10" bundt tin
- Preheat the oven to 180c/160c fan. Liberally butter the bundt pan, ensuring you get into all the nooks and crannies, then dust with flour to cover all surfaces. Tip the excess into the bin.
- Cream together the butter and sugar until light and fluffy. Beat in the eggs one at a time, followed by a tablespoon of the flour from the 350g with each addition of an egg to stop the mixture from splitting.
- Mix the remaining flour, bicarbonate of soda and salt together in a bowl.
- Mix the zest, yogurt and essence in a measuring jug.
- Add one third of the flour mix to the batter and gently beat in. Add half of the yogurt mixture and beat lightly until well combined. Repeat until the flour and yogurt mixes are incorporated.
- Pour into the pre-prepared tin and bake for about 1 hour, checking from 50 minutes onwards until a skewer inserted into the deepest part of the cake comes out clean.
- Leave to cool in the tin for ten minutes until the cake has shrunk away from the sides.
- Whilst the cake is cooling, pour the grapefruit juice and granulated sugar into a small saucepan and heat gently until the sugar dissolves. Boil rapidly until the liquid is reduced to a third of its original volume and you have a thick, sticky syrup.
- Turn the cake out onto a cooling rack then carefully drizzle the grapefruit syrup over the top.
- When the syrup has cooled on the cake slightly, liberally sprinkle with the granulated sugar.
Under the Blue Gum Tree: Haemul Pajeon (Korean Seafood Pancake)
At the moment, I'm doing okay because I'm back running so burn off a fair few calories each week. I eat a pretty balanced diet (and probably a few more snacks than I should) but my weight is stable. But in the not-too-distant, I will have to hang my running shoes up for a while and go back to watching what I eat.
Perusing the Guardian website last weekend, I happened across Felicity Cloake's Reader Recipe Swap on the 5:2. All the 'diet' food sounded just great. but when I noticed that the winning recipe was submitted by Clare from Under the Blue Gum Tree, I knew I had to try it out because it would be a good one.
I 'met' Clare via Twitter through our shared love of Dan Lepard's books when I was doing the 366 Recipe Challenge. Clare has challenged herself to do 5:2 this year and loves how it fits into her lifestyle. Personally, I'd find the idea of skipping breakfast really hard to do some days but if it would help me drop the last half stone I want to shift once I can't run any more then I'm game for a go at this.
 So tonight, having run seven miles, I rewarded myself with the whole of Clare's pancake as it's only 502 calories (the run burned nearly 900). And quite frankly I'm stuffed to the gills. I was actually teetering on fullness after the first half, but valiantly soldiered on as there was nobody around to finish the rest*. I could definitely see this working as something for me to take to work for lunch if I ever do 5:2.
Because I was a numpty and used up my peppers in veggie chilli earlier this week, I used half a diced courgette instead. Eating so much green stuff made me feel even more healthy and much less guilty about the caramel egg I scoffed when my run was done.
You can find the recipe here.
*Quite a big bite of the elephant tonight
A Waddle of Oreo Penguin Cupcakes
 |
| Don't eat us, we're too cute! |
The cakes in question are a belated birthday cake gift to the questioner 'M' who I work with. Despite FaceAche telling me it was his birthday, I still forgot so promised he could choose what cake I would make to take into work this week. He emailed me a link to a page about cupcake decorating from Bored Panda* and requested a waddle of penguins. Well one, but you can't make just one penguin as he'd be lonely.
Given that it still feels like the middle of winter in the UK, despite it being April 7th, I duly accepted the challenge and spent today intermittently working on my little army.
The original recipe comes from the My Feelings Taste Like Cupcakes blog by Anna. Her post about the trials and tribulations of working with oreos is entertaining and certainly made my attempt a whole world easier.
I'm guessing that pretty much all Americans have a knack for twisting the tops off of oreos successfully. I'm so weedy that I couldn't even manage to do one - but a sharp knife worked wonders. I also rather prudently (well mostly because oreos are flipping expensive) separated the ones for the faces and made the wings before making the crushed oreos for the base and filling so that I could use the broken bits rather than ending up with a pile of wasted wings. A sharp knife definitely helps and I found using my fingers as a cutting guide meant mostly clean even breaks.
 |
| I'm ready for my close up |
Anyhoo onto the techie bit. As Anna doesn't detail how to make the cupcakes because she wasn't happy with the recipe she used for the cake bit, I chose to use my favourite vanilla cupcake recipe from the 366 Recipe Challenge - a Dan Lepard one. Partly because it is pretty much the same as the one I used to use pre-challenge and partly because it has to be my favourite post from the challenge. (Vanilla cupcakes are quite popular on the blog as the post about Mary Berry's cupcakes has had a whopping 20,000+ views since I posted it in March 2012.)
Because the Lepard recipe makes a smaller quantity of cakes, I got 10 for my troubles so I'll detail the steps here. Anna's post has a great set of pictures on how to make and assemble the cakes. For me, it took enough patience to decorate the things without remembering to photograph every step!
Makes 10 cupcakes
- 2 packets oreos (the double stuffed ones are easiest to work with)
- 1 orange Starburst (the recipe gets expensive if you can only find family sized packs!)
- 20 eyes - googly, made from sugar paste or bought edible ones
- Muffin tin lined with ten paper cases
- 10 oreo halves minus the cream (equivalent of - use the odds and ends from making the wings)
- 50g butter
- 125g very soft, unsalted butter
- 125g caster sugar
- 2 eggs
- 2 tsp vanilla essence
- 150g plain flour
- 2 tsp baking powder
- pinch of table salt
- 125g butter
- 60g cream cheese
- 225g icing sugar
- 2tsp vanilla essence
- 30ml double cream
- 6 oreo halves minus the cream (equivalent of - use the odds and ends from making the wings)
- 225g icing sugar
- 125g marshmallow fluff
2, To make the base, split five oreos in half and remove the cream. Place in a plastic bag and bash with a rolling pin until fine crumbs. Melt the butter and stir in the oreos. Put a tablespoonful of mixture into the base of each cupcake case and flatten down. Bake at 160c/140c fan for five minutes. Remove and increase the oven temperature to 180c/160c fan.
 |
| A veritable waddle of ping-wings |
4, Bake for 20-25 minutes until golden and firm to the touch. To stop the cakes peaking, put a baking sheet on the shelf above the muffin tin. Remove and leave to cool.
5, Make the filling by beating the butter, cheese, cream and vanilla essence together. Beat in the icing sugar until well combined. Remove three tablespoonfuls into a small bowl. Crush the oreos and then stir through the filling in the small bowl. Core the cupcakes and pipe filling into each, replacing the core on the top.
6, Add the marshmallow fluff to the remaining filling from step five (the stuff without the crushed oreos in) and beat until well combined then whisk in the icing sugar until it forms a stiff, pipeable mixture.
7, Put the Starburst on a microwaveable plate and heat for fifteen seconds. Move it quickly to a clean work surface then roll flat with a rolling pin and cut small triangles to make the beaks.
8, Finally assemble the cakes by piping a plain swirl of topping onto the cake then adding the wings, faces and beaks. Because it's tough to get a clean split on the faces, I took Anna's advice and spread a little of the topping on each face - it helped stick the eyes and the beak too.
Et voila. Cupcakes that are too cute to eat!
* I had seen this post before - check out my version of the Cookie Monster Cupcakes
The Boy Who Bakes' Red Velvet Cake
For every detractor of social media, you'll find a hundred people who love it. I'm definitely in the "Love It" camp. Sure it's taken me a while to find my spiritual home, but now I've taken up residence in the Twittersphere, I think I'm there to stay.
 |
| Elegantly sliced by my work colleagues |
But Twitter is home to the very hippest of my circle of friends and family and also home to my adopted Twitter family. I quite can't remember how my Twitter family came about but through a chain of Tweets, I was "adopted" by Paul, Kate, Maria and Dicky. Like any family we may not "get together" for ages but whenever we do it's either a riot of belly laughs or an outpouring of love and support that sometimes I don't even get from my real-world family.
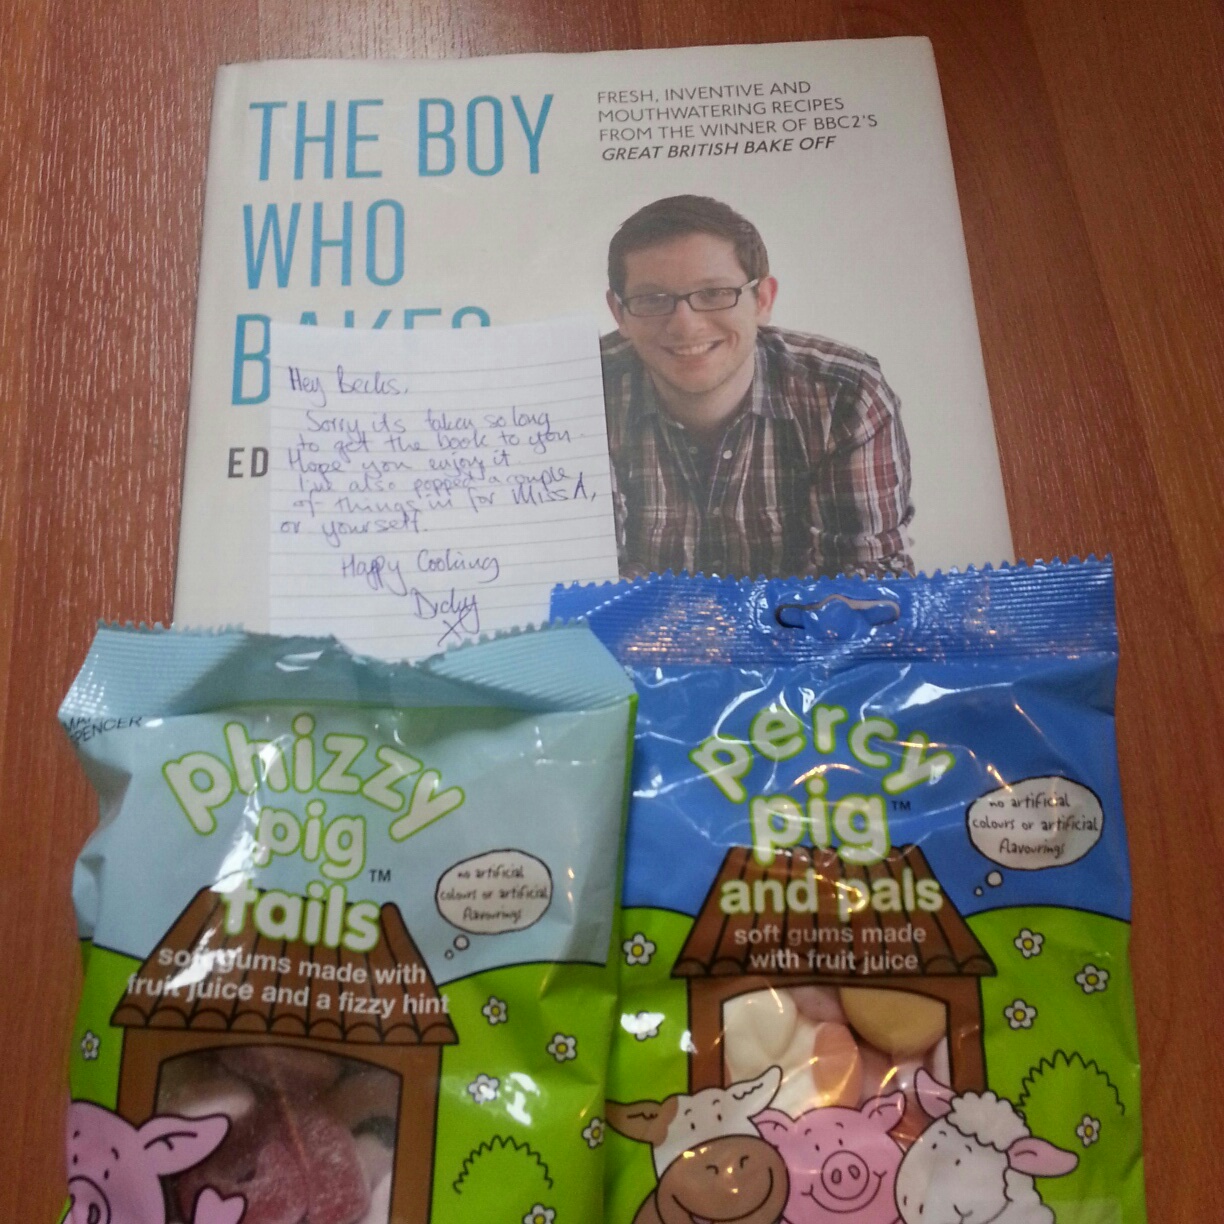
Despite having never met in real-life, they all generously sponsored me running the Bath Half last year. And getting to the point of this post I recently received an ace parcel from Dicky. He had a spare copy of The Boy Who Bakes and asked if anyone wanted it. I offered to give it a good home and to pay the postage. A little while later, the book arrived accompanied by two packs of Percy Pig sweets for Miss A. Dicky wouldn't take any payment for the postage and didn't put a return address on the package so I couldn't send him any cake (Bunders, I would have if I could have ;-)) so I made a cake for the charity bake sale at work instead.
 |
| Ready for the oven |
This time the bake was successful although my attempt to get ahead with the icing went awry. I made the sugar and butter part the day before and after a late night out at Book Club, I decided to hand beat in the cream cheese and ice the cake at gone midnight. The icing went lumpy - I probably should've beat the butter cream with the mixer again before adding the cream cheese - which detracted from the decoration but it still tasted good - and got rave reviews from my normal cake testers as well as adding to my growing army of admirers.
Thank you again Dicky. You've made lots of people very happy x
 |
| Slightly lumpy icing |
 |
| I love post like this |
Subscribe to:
Posts (Atom)
